2014/11/06

cssSlider Generator

cssSlider 是一套建立 slider 特效的商用軟體,特別之處在於,它不需要 jQuery 就能做到跨瀏覽器的支援,目前可在 Windows 和 Mac 桌面環境安裝使用,Linux 環境可以透過 Wine 執行,即使不懂程式碼,使用者大抵就會自行修改設定。

$ wine .wine/drive_c/cssSlider/cssSlider.exe
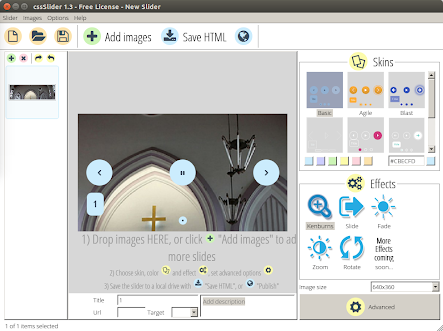
事先要準備好數張圖檔,尺寸最好一致。

載入的圖檔,預設會套用 Skin 和 Effect。

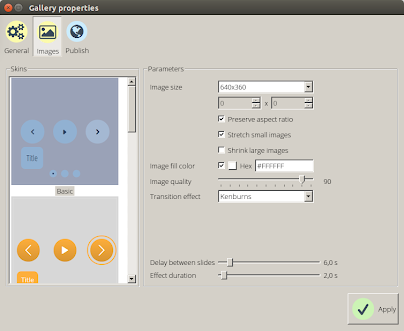
更詳細的設定,包括是否自動撥放、底色選擇、特效微調等。

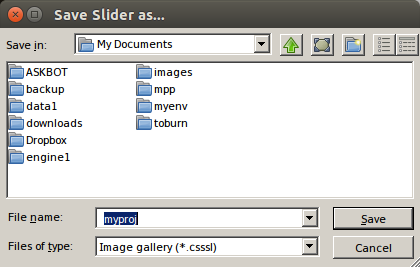
存成專案後,日後可讀取修改,假設專案命名為 myproj 的話,可發現目錄裡會建立 myproj.csssl 檔案,內容是 XML 格式。

cssSlider
+ data1
  + images
    + 1.jpg
    + 2.jpg
    + 3.jpg
    + 4.jpg
    + 5.jpg
    + 6.jpg
  + tooltips
    + 1.jpg
    + 2.jpg
    + 3.jpg
    + 4.jpg
    + 5.jpg
    + 6.jpg
+ engine1
  + basiccontrols.eot
  + basiccontrols.svg
  + basiccontrols.ttf
  + basiccontrols.woff
  + ie.css
  + ie.js
  + style.css

2014/09/19

Ubuntu Client for Google Drive

Grive is the command-line tool, while Grive Tools give you the UI for setup. See http://www.thefanclub.co.za/how-to/ubuntu-google-drive-client-grive-and-grive-tools and http://www.lbreda.com/grive/installation http://www.webupd8.org/2012/05/grive-open-source-google-drive-client.html for reference. add-apt-repository is provided by the software-properties-common package.

sudo add-apt-repository ppa:nilarimogard/webupd8
sudo apt-get update
sudo apt-get install grive

sudo add-apt-repository ppa:thefanclub/grive-tools
sudo apt-get update
sudo apt-get install grive-tools

For command line environment, first create the folder for sync, run "grive -a" in that folder and follow the link to get authenticate code. Paste the code and the data will sync. Use cron job for "automatic sync".

2014/06/12

ElasticSearch on Ubuntu

剛裝完 Ubuntu 14.04 來試 ElasticSearch,下載 elasticsearch-1.2.1.deb 後,安裝過程會建立 elasticsearch 系統帳號,啟動指令是 sudo service elasticsearch start,想要在 bootup 啟動,要執行 sudo update-rc.d elasticsearch defaults 95 10。

接著試裝 logstash_1.4.1-1-bd507eb_all.deb 遇到下列問題,雖然這東西未必需要安裝:

dpkg: dependency problems prevent configuration of logstash:
logstash depends on java7-runtime-headless | java6-runtime-headless | j2re1.7; however:
Package java7-runtime-headless is not installed.
Package java6-runtime-headless is not installed.
Package j2re1.7 is not installed.

意思是要從 java6 或 java7 選一個來裝,參考文件 [1] [2] 提到 openjdk-7-jre-headless,照提示要用 apt-get -f install 才搞定。想要測試是否正確啟動:

$ curl http://localhost:9200
{
  "status" : 200,
  "name" : "Runner",
  "version" : {
    "number" : "1.2.1",
    "build_hash" : "6c95b759f9e7ef0f8e17f77d850da43ce8a4b364",
    "build_timestamp" : "2014-06-03T15:02:52Z",
    "build_snapshot" : false,
    "lucene_version" : "4.8"
  },
  "tagline" : "You Know, for Search"
}

2014/04/10

Plone + WebDAV Client

    Plone WebDAV Windows XP

    • Step-By-Step
      • Click Start, My Network Places
      • In the left task bar click "Add a network place"
      1. Once in the "Add Network Place Wizard"
      2. Click Next
      3. Select "Choose another network location" and click Next
      4. Enter "https://plone.uconn.edu:328/" into the "Internet or network address" field.
      5. When prompted for Username and Password provide your NetID and its Password and then click OK
      6. If successful you will be asked to name the network connection, this can be anything you want but normally you should leave it as plone.uconn.edu
      7. Lastly select "Open this network place when I click Finish." and proceed to click Finish
      • Warning: You may need to re-enter your NetID and Password as we do not store it for your safety
      • Once open, navigate to the Members folder and then open the folder with your Name or NetID.
      • You can now edit, add, and remove files in your Plone folder.

    Plone WebDAV Ubuntu

    • Step-By-Step - Note: Tutorial targets default interface, other interfaces are supported but GNOME/Nautilus is described below
      • In the top bar Click Places, "Connect to Server..."
      • Once in the "Connect to Server" window
        • Set "Service type" to "Secure WebDAV (HTTPS)"
        • Set "Server" to "plone.uconn.edu"
        • Set "Port" to "328"
        • Set "User Name" to be your NetID
        • Optionally
          • Set "Folder: to be "Members/NETID" where NETID is your NetID
          • Check "Add bookmark", Give a name to the bookmark.
        • Once done, Click Connect
        • You will now be prompted for your Kerberos Login
          • In the "Password" field enter your NetID password
          • For security leave "Forget password immediately" selected
          • Click Connect
      • Once open, navigate to the Members folder and then open the folder with your Name or NetID.
        • If you completed the optional steps this will not be needed
      • You can now edit, add, and remove files in your Plone folder.

    Plone WebDAV OS X

    • Step-By-Step - Note: Do not connect through the finder, the way apple stores files is different than plone and will cause problems inside your plone home folder
      • Download Cyberduck from Cyberduck.ch or click Here for a recent version
      • Unzip Cyberduck and move the app into your Applications folder
      • Launch Cyberduck, Once open
        • Click "Open Connection" in the upper left corner
        • from the drop down select "WebDAV (HTTP/SSL)"
        • Set "Server" to "plone.uconn.edu"
        • Set "Port" to "328"
        • Set "Username" to your NetID
        • Set "Password" to your NetID password
        • Click Connect
        • Once Connected navigate to the Members folder and then open the folder with your Name or NetID.
        • From here you can edit, add, and remove files in your Plone folder.
          • Simply treat the Cyberduck window like a finder window for dragging and dropping.
          • If you are going to edit live in Plone make sure you are using the edit button in the top bar.

    Plone WebDAV Windows 7

    • Step-By-Step - Note: Do not connect through Windows Explorer, Windows 7 has changed the way it handles WebDav authentication and can have issues connecting depending on the site you are connecting to.  
      • Download Cyberduck from Cyberduck.ch or click Here for a recent version
      • Install Cyberduck
      • Launch Cyberduck, Once open
        • Click "Open Connection" in the upper left corner
        • From the drop down select "WebDAV (HTTP/SSL)"
        • Set "Server" to "plone.uconn.edu"
        • Set "Port" to "328"
        • Set "Username" to your NetID
        • Set "Password" to your NetID password
        • Click Connect
        • Once Connected navigate to the Members folder and then open the folder with your Name or NetID.
        • From here you can edit, add, and remove files in your Plone folder.
          • Simply treat the Cyberduck window like a Windows Explorer window for dragging and dropping.
          • If you are going to edit live in Plone make sure you are using the edit button in the top bar.

2014/04/08

FTP Server Testing

http://ftptest.net/ provides useful debug info to help figuring out FTP server configuration issue.

Check passive mode if your FTP server running within a firewall. Pure-FTPd PassivePortRange

2014/03/28

discuz Installation

$ sudo apt-get install php5-cli php5-mysql php5-fpm
$ sudo apt-get install mysql-server mysql-client
$ mysql -u root -p mysql
mysql> CREATE USER 'marr'@'localhost' IDENTIFIED BY 'mysecret';
mysql> GRANT ALL PRIVILEGES ON *.* TO 'marr'@'localhost' WITH GRANT OPTION;
mysql> SHOW GRANTS FOR 'marr'@'localhost';

$ sudo apt-get install nginx nginx-common nginx-full
$ sudo vim /etc/nginx/sites-available/default
$ sudo service nginx restart
$ cd /usr/share/nginx/www
$ sudo mkdir discuz
$ suco chown marr.marr discuz
$ cd discuz
$ unzip Discuz_7.2_FULL_TC_UTF8.zip

visit http://mysite.com/discuz/upload/install/

# in case of folder permission
$ sudo chown www-data.www-data templates

Configuring and Optimizing php-fpm and Nginx PHP-FPM Eating Memory

update-rc.d: warning: php5-fpm stop runlevel arguments (0 1 6) do not match LSB Default-Stop values (none)

2014/03/11

Tools and Utilities

Mirror Part of The Site

$ wget --mirror --page-requisites --adjust-extension
 --no-parent --convert-links
 --directory-prefix=my_folder http://mysite.com/my_url